
Mice-y cards... with DT Anirudh

Hello, friends!

Today, I've got two fresh and vibrant projects to share with you all using the latest Tubby release; 
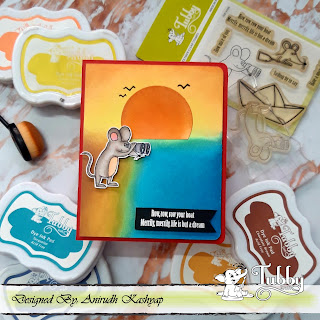
CARD 1


This card was really easy to put together.
I started by creating the beach sunset scene using Chinese blue, Sapphire blue and Turquoise dye inks for the sea; Chocolate brown and mustard yellow for the sand; and Lemon yellow and Tangy orange for the sky. Our awesome blending brushes provide a smooth blend and are so ergonomically designed.
I used Tangy orange to ink a die-cut circle for the sun as well.


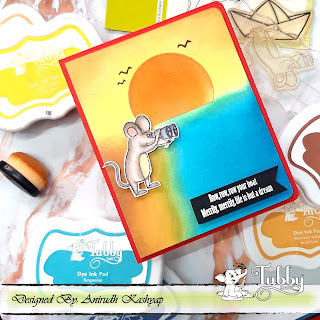
I then stamped the mice with binoculars using Jet black ink, copic colored it and fussy cut it out.
For the sentiment, I simply white heat embossed onto black cardstock.
Lastly, I assembled the entire card on a red cardbase and also added a few flying birds using black pen along the sun to set the scene.


And there we have our cute mice-y card!
Let me show you all the next example...
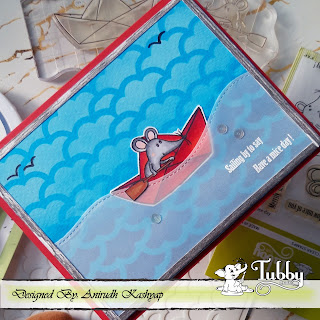
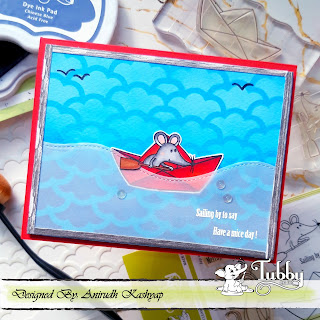
CARD 2

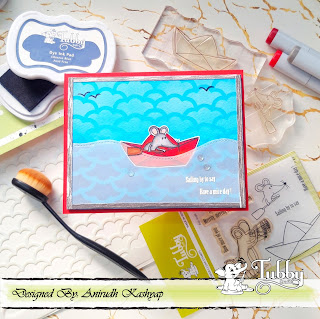
For this card, I began by stamping the mice with the roe and then masked it before stamping the boat using the Jet Black dye ink, then I colored and fussy cut the combined image and set it aside.


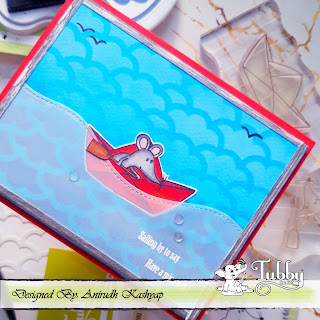
For the background, I used the clouds stencil urpight for the clouds and reversed for the waves.
I simply chose a blue cardstock and then used Aqua dye ink for clouds and Chinese Blue ink for the waves.
I also added vellum overlay, with the sentiment white heat embossed over it, to act as a border for the boat.
As a quick tip, always make sure that glue is not visible through the vellum, for which I added a pattern paper frame along the edges.

Next, I assembled the card.

I added the mice by cleverly surfacing the roe above and rest boat below the vellum for a better look, added a few birds in the sky and a few jewel drops to accent.

Lastly, I adhered this panel over a red card base and our project is completed!


I loved creating these cards so much and hope that you would enjoy making them too!
Until next time, Keep Crafting!

The products used to create these projects are listed down below;

The TUBBY CRAFT products used are-


Visit https://www.tubbycraft.com/ and check our exciting range of products!

Tubby Craft products are also available at these online retailers:-


Comments

Popular posts from this blog

ATC coins using mini stamps

Hello there, This is Priyadarshini here today, I have ATC coins here today using stamps from Tubby craft. I have used 3 different stamps to make these. They are easy and quick to make and absolute fun too. I have a common base here which is black cardstock and die cut small circle from white cardstock. I created different background for each using stencils and inks from Tubby craft.  What are Artist trading coins? They are miniature art created on 2.5"circle of heavy base cardstock.  ATC with stenciled background                      First, I stenciled the white cardstock using stencils and dye inks. Then added this to a black circle die cut.  Inks used are:  Turquoise ,  Olive green ,  Lavender violet I offset the stencil to get a a complete stenciled background. I stamped the images from  Lovely Owl  and  Butterfly Love  and coloured them with colour pencils.  To embellish, I added corrugated sheet,cotton gauze and twine.  To finish the coins, I added

Tubby Craft - Penguin Love - Birthday Cards by Deepti

Hello Everyone, I'm stopping by to share two birthday cards using cute Tubby Craft stamp called "Penguin Love" and "Birthday Wishes". I have used Masking technique to make both the cards. Card 1 To make this card, I die cut out the white card stock and stamped the penguins by masking them using Black tubby craft ink. Once satisfied, I stamped the balloons too and colored all these images using alcohol markers. After that I stamped the sentiment on white strip and adhered the same using foam tape along with washi tape. Glued it on Pista green card stock. Finally added some clear sequins to complete it. Here is my second card using same stamp set.. For this card also, I die cut out white card stock . Then I stamped the image and masked it to ink the background. After that I stamped the balloons and the sentiment. Added stamped and fussy cut gift too.  Finally adhered it on matching note card and added some matching s

Two amazing anniversary cards by Anushree

Hi Everyone !! Hope you all are doing good and crafting too. I have two cards for today. I have highlighted  different techniques for each card. Onto my first card, I have tried showcasing repeated stamping in a border style . I have used Plumeria Florals stamp set and Jet Black dye ink from Tubby craft to stamp the border first. Next I chose Imperial Red and Lead gray dye inks from Tubby Craft to color my florals. Sentiment is a die cut on Gold card stock and the card is embellished in gold peals. For border,I have adhered Gold border die cut to enhance the card on a black cardstock. Now onto my second card, I am using Checkered Stencil for the background .I have used rainbow colors from Tubby Craft Dye ink collection to put them on paper using blending brushes. I masked the center with a circle die cut before applying inks to the card base. Once stenciled background is ready,I removed the mask and stamped sentiment from Luc