
Merry & Bright Christmas card with stenciled background

 Hi there! 

It's almost December And I'm feeling the Christmas spirit at home and in the craft room! I stamped a lot this weekend and used my brand new stamps from Tubby Craft. 

I swear I smile the entire time I'm using their fun and pretty stamps. They bring me joy for sure. I got to color, and glitter and generally get in the feeling of winter! I have two cards to share with you today! Let's kick off this season!

So Today I’m sharing this project over on the tubby craft blog featuring the watercolour lines stencil & shine on stamp set. 


For the background I used the watercolour stripes stencil & blended inks for a nice, gradient effect.

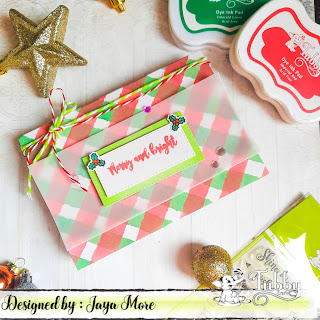
I die cut 2 stitched rectangle with white cardsotck & I blended some emerald green on the edges of the die cut. And For the sentiment I used the "Merry and Bright" from the same stamp set.

Positioned the stencil on the diagonal ensuring that corners were included, then used some low tack tape to hold the stencil in position.

Following the lines (from top to bottom) of the stencil I used a blending brush with "Imperial red" Ink pad.  

I then lifted the stencil and repositioned it, so that the stencil lines covered teh "imperial red" lines I had just created.  I then used the same technique with "Emerald green".

Once the tape and stencil are removed you can see the finished background grid, which I think is really pretty as they're.

I then moved on to the stamping using imperial red ink  I stamped the sentiment and

Using the small piece of card, I coloured the holly leaves image. Then coloured it using Alcohol markers. then cut out the image and adhered it over the stamped image on the card. 


You can check out my YouTube video to see all the details of how to make this –

Supplies used -

https://www.tubbycraft.com/penguin-love-2.html


Card 2
Are you excited about Christmas? Have you started to Deck the Halls?? 
I created this little Christmas home scene.

I took a panel of Whisper White cardstock 4” by 6” and stamped the pair of baubles, snowflakes & stars from the shine on stamp set in various Inks.


I had absolutely no idea of what I wanted to do when I started this card. I just stamped this little girl decorating a Christmas tree. Then copic colored them, 

I had a new watercolour lines stencil that I wanted to try out, so that became the floor of their little house. I added a Christmas tree with little jar.

by simply adding lines for the ornaments to hang on will change the essence of this card.

After that I added the sentiment from the same stamp set. I made a little wreath by stamping the holly leaves & hanged it on a wall. 

Finally added the white gelly roll details on the baubles. 

A very simple Christmas card, I hope you like it.


Thanks for visiting my blog today, I love to read what you think of my projects so please do let me know. Please stop by again soon.

Details of the products I used for this project can be found below.
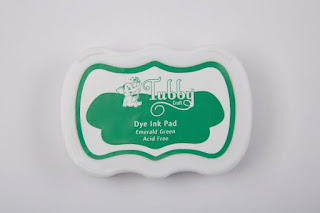
Comments

Popular posts from this blog

ATC coins using mini stamps

Hello there, This is Priyadarshini here today, I have ATC coins here today using stamps from Tubby craft. I have used 3 different stamps to make these. They are easy and quick to make and absolute fun too. I have a common base here which is black cardstock and die cut small circle from white cardstock. I created different background for each using stencils and inks from Tubby craft.  What are Artist trading coins? They are miniature art created on 2.5"circle of heavy base cardstock.  ATC with stenciled background                      First, I stenciled the white cardstock using stencils and dye inks. Then added this to a black circle die cut.  Inks used are:  Turquoise ,  Olive green ,  Lavender violet I offset the stencil to get a a complete stenciled background. I stamped the images from  Lovely Owl  and  Butterfly Love  and coloured them with colour pencils.  To embellish, I added corrugated sheet,cotton gauze and twine.  To finish the coins, I added

Tubby Craft - Penguin Love - Birthday Cards by Deepti

Hello Everyone, I'm stopping by to share two birthday cards using cute Tubby Craft stamp called "Penguin Love" and "Birthday Wishes". I have used Masking technique to make both the cards. Card 1 To make this card, I die cut out the white card stock and stamped the penguins by masking them using Black tubby craft ink. Once satisfied, I stamped the balloons too and colored all these images using alcohol markers. After that I stamped the sentiment on white strip and adhered the same using foam tape along with washi tape. Glued it on Pista green card stock. Finally added some clear sequins to complete it. Here is my second card using same stamp set.. For this card also, I die cut out white card stock . Then I stamped the image and masked it to ink the background. After that I stamped the balloons and the sentiment. Added stamped and fussy cut gift too.  Finally adhered it on matching note card and added some matching s

Two amazing anniversary cards by Anushree

Hi Everyone !! Hope you all are doing good and crafting too. I have two cards for today. I have highlighted  different techniques for each card. Onto my first card, I have tried showcasing repeated stamping in a border style . I have used Plumeria Florals stamp set and Jet Black dye ink from Tubby craft to stamp the border first. Next I chose Imperial Red and Lead gray dye inks from Tubby Craft to color my florals. Sentiment is a die cut on Gold card stock and the card is embellished in gold peals. For border,I have adhered Gold border die cut to enhance the card on a black cardstock. Now onto my second card, I am using Checkered Stencil for the background .I have used rainbow colors from Tubby Craft Dye ink collection to put them on paper using blending brushes. I masked the center with a circle die cut before applying inks to the card base. Once stenciled background is ready,I removed the mask and stamped sentiment from Luc