
'Bundle of joy' - Baby cards

Hey everyone,

Welcome back... This is DT Priyadarshini here today with baby cards. I have three cards with different backgrounds and they all have embossing. It is always fun to have make your own background for cards using stencil and inks. 
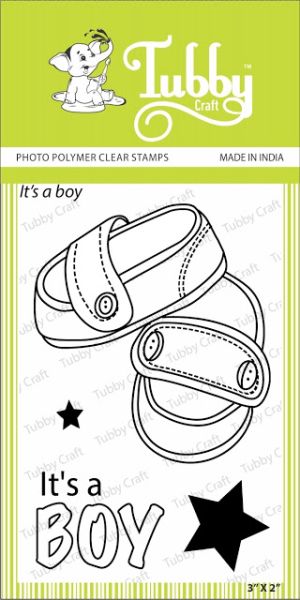

Card 1 - It's a boy


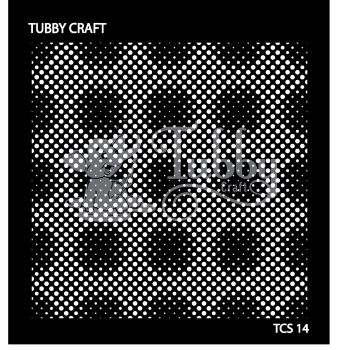
To make this card, I first did stenciling using Dot Illusion stencil. 
I used, versamark ink since I wanted to do heat embossing. 
While the versamark is still wet, I added silver embossing powder and heat set it. 
Since heat embossing resists inking, I did inking using Aqua blue ink and turquoise. I kept the centre of the card light and darker towards to edges. 
I stamped the cute show image from It's a boy stamp set along with some stars and sentiment. 
After colouring the image, I fuzzy cut it and added a black strip to the card and finished it by adding the sentiment and stars. 


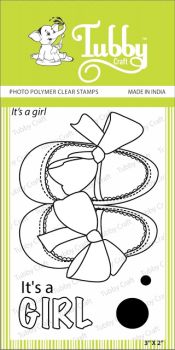
Card 2 - It's a girl


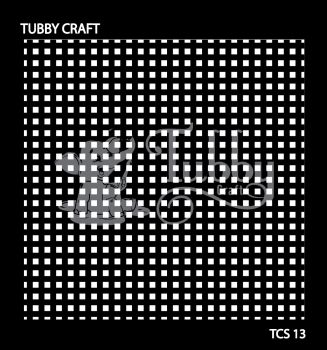
For my second card, I used checkered stencil and light pink ink. 
To make the edges, a little darker, I added hot pink ink
I stamped the shoe image and sentiment from It's a girl stamp set. I coloured and fuzzy cut the image and kept it aside. 
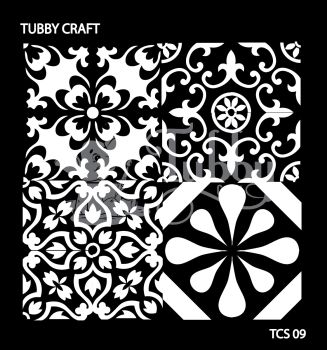
I die cut a black circle, I stenciled and heat embossed using silver embossing powder. The stencil used is Moroccan tiles.
I added the image on the embossed circle and finished the card with a sentiment. 


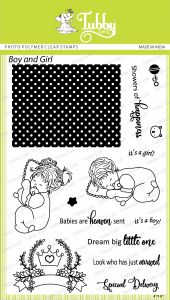
Card 3 - Bundle of joy


For the last card, first, I embossed stars using gold embossing powder and circle using silver powder. 
Then inked the background using, lawn green and emerald green ink. 
I stamped a sleeping baby image from Make a wish set and added that to the card.
I used a sentiment from the same set along with rattle image. 


Hope you all liked the cards.. Do check out blog for more inspiration from our design team.


Supplies used

It's a Boy

It's a Girl

Boy and Girl

Dot Illusion Stencil

Checkered Stencil

Moroccan Tiles Stencil


Medium Acrylic Block

Comments

Popular posts from this blog

ATC coins using mini stamps

Hello there, This is Priyadarshini here today, I have ATC coins here today using stamps from Tubby craft. I have used 3 different stamps to make these. They are easy and quick to make and absolute fun too. I have a common base here which is black cardstock and die cut small circle from white cardstock. I created different background for each using stencils and inks from Tubby craft.  What are Artist trading coins? They are miniature art created on 2.5"circle of heavy base cardstock.  ATC with stenciled background                      First, I stenciled the white cardstock using stencils and dye inks. Then added this to a black circle die cut.  Inks used are:  Turquoise ,  Olive green ,  Lavender violet I offset the stencil to get a a complete stenciled background. I stamped the images from  Lovely Owl  and  Butterfly Love  and coloured them with colour pencils.  To embellish, I added corrugated sheet,cotton gauze and twine.  To finish the coins, I added

Tubby Craft - Penguin Love - Birthday Cards by Deepti

Hello Everyone, I'm stopping by to share two birthday cards using cute Tubby Craft stamp called "Penguin Love" and "Birthday Wishes". I have used Masking technique to make both the cards. Card 1 To make this card, I die cut out the white card stock and stamped the penguins by masking them using Black tubby craft ink. Once satisfied, I stamped the balloons too and colored all these images using alcohol markers. After that I stamped the sentiment on white strip and adhered the same using foam tape along with washi tape. Glued it on Pista green card stock. Finally added some clear sequins to complete it. Here is my second card using same stamp set.. For this card also, I die cut out white card stock . Then I stamped the image and masked it to ink the background. After that I stamped the balloons and the sentiment. Added stamped and fussy cut gift too.  Finally adhered it on matching note card and added some matching s

Two amazing anniversary cards by Anushree

Hi Everyone !! Hope you all are doing good and crafting too. I have two cards for today. I have highlighted  different techniques for each card. Onto my first card, I have tried showcasing repeated stamping in a border style . I have used Plumeria Florals stamp set and Jet Black dye ink from Tubby craft to stamp the border first. Next I chose Imperial Red and Lead gray dye inks from Tubby Craft to color my florals. Sentiment is a die cut on Gold card stock and the card is embellished in gold peals. For border,I have adhered Gold border die cut to enhance the card on a black cardstock. Now onto my second card, I am using Checkered Stencil for the background .I have used rainbow colors from Tubby Craft Dye ink collection to put them on paper using blending brushes. I masked the center with a circle die cut before applying inks to the card base. Once stenciled background is ready,I removed the mask and stamped sentiment from Luc